Always Hoppy to work on Arts and Crafts

Always Hoppy to work on Arts and Crafts
Dreaming of Creating A World Filled with Art

Welcome

Like so many others I love to Craft. I wanted to share some of my ideas and get some new ones too from you. I dabble in so many things...I love to Mod Podge, paint, polymer clay, make jewlery, sew and anything I get my grubby hands on. I sell on Etsy and try to do as many craft shows as possible. I hope you will share my in my arts and crafts journey.


Tuesday, January 11, 2011

Stuck on Arm warmers


Yup arm warmers again .... this time with a knitting loom...  i really didn't know how i was going to complete this but i thought I'd give it a go.  As you can see i didn't use the entire loom i used 9 pegs.  i was worried about the spaces left by the side gaps but as you can see on the pictures below there really no noticeable difference.  The only thing I could not figure was how to make a thumb hole...got any suggestions?  While I turmoil through the thumb hole issue i have been using these for working on my crafts since it is perfect since it doesn't hinder movement with my fingers :)
Hope this has inspired you to just go for it. Ya never know what you ll end up with.


Saturday, January 8, 2011

My first attempts at armwarmers -mini tutorial

OK first just get a pair of socks...stretchy ones are best..i like fuzzy too.  Even better if you can get ones with a design on them :)

sorry i didn't take pic at the cut off stages...but it is really easy...just cut a few inches off where your toes would have gone...try them on to see if this is a lengh you like ..(tip..to help measure just remember thumb hole is gonna be where the heel is)  Now cut a little slice in the heel area,,i would say about 1/2 inch to start off with. Then cross cut in that same slit (remember - very little cuts...it is easier to go bigger but you cant make the hole smaller once you have done a cut.)  Then it is time to do a tight whip stitch around the thumb hole.  I use a embroidery thread and place my stitches as close as possible. I do the same for the bottom raw edge..it gives it a wavy look which i really like :)

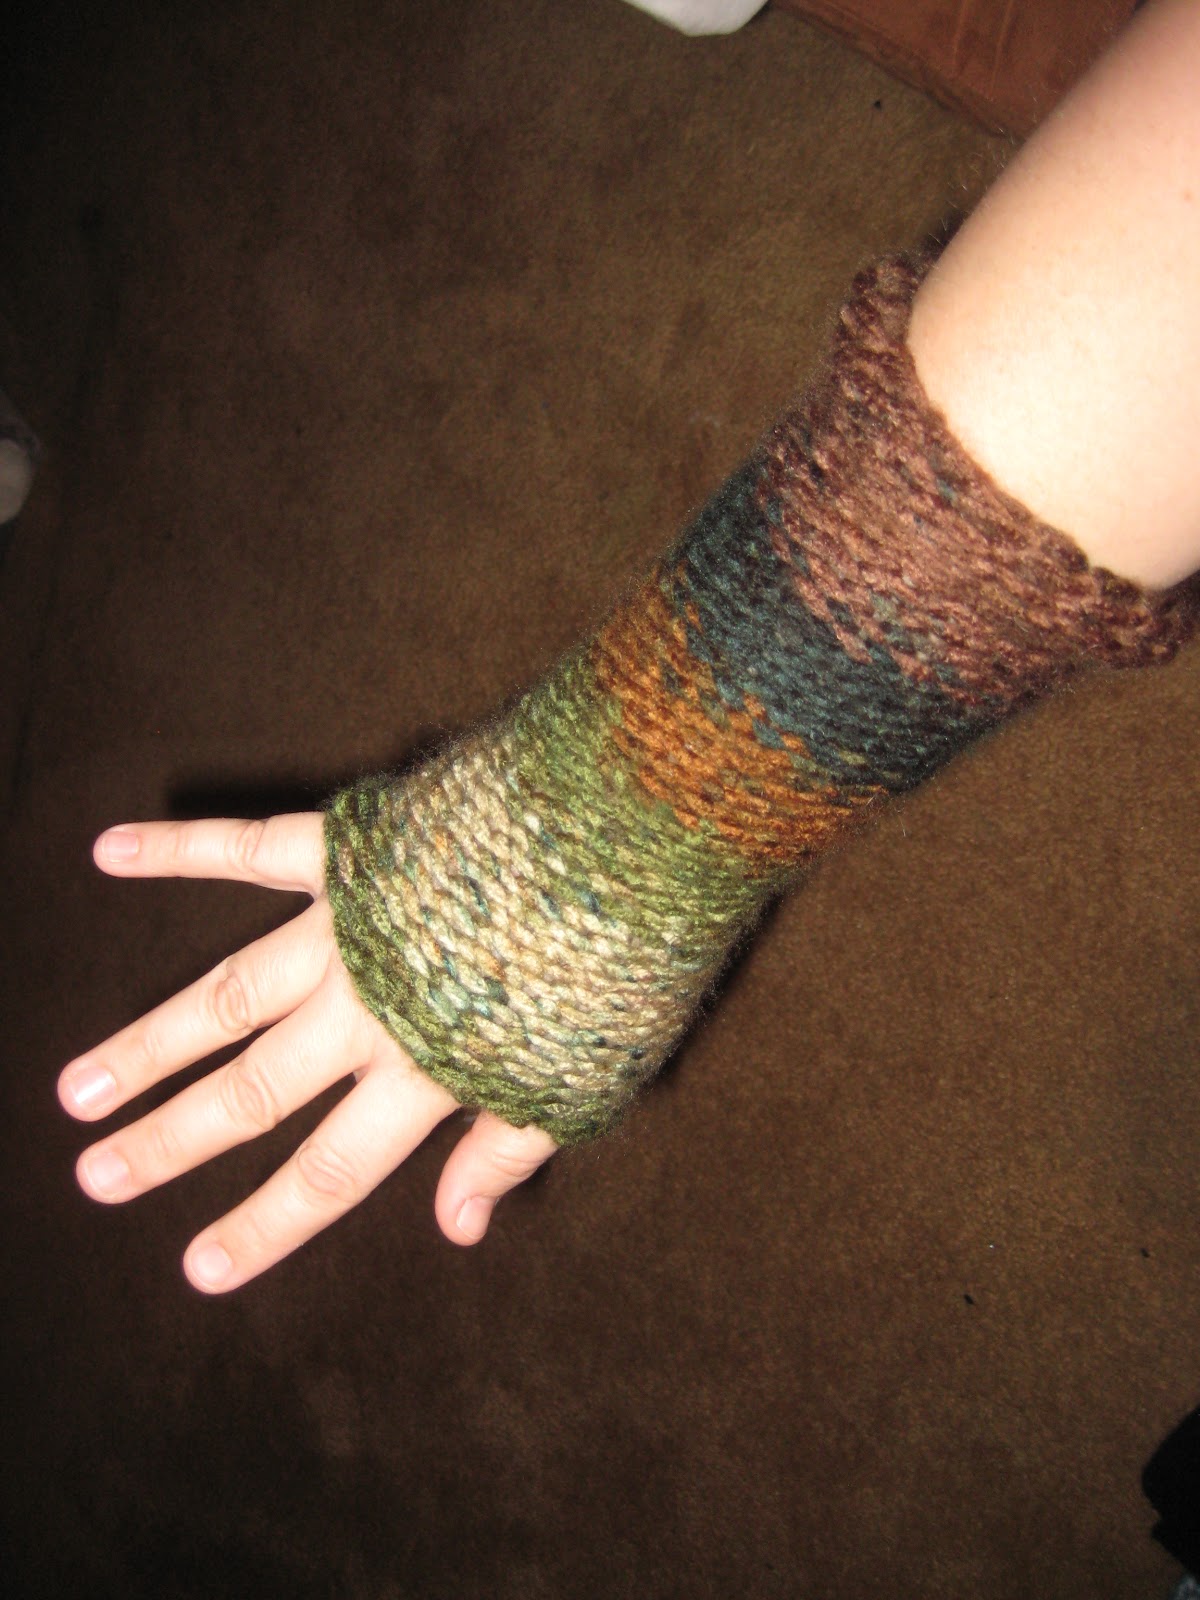
Tada.. my daughter's hands are much prettier than mine but she was unavailable this time so these are my chubby hands. They are warm and comfy :)

Another tip is to insert a round object ..like i did with this medicine bottle and stitch around it. Makes it easier and give it a uniform look on both sides.  Play around with different size bottles and find which one fits you best.  I have even seen other tutorials use their thumb...but i am too afraid of poking myself

this is a fun project and you can really embellish the arm warmer after. Have fun and let me know how yours come out :)

Thursday, November 25, 2010

Happy Thanksgiving- Giving thanks and sharing some of my latest polymer clay creations :)

it has been crazy for me lately and i haven't had time to blog for a while, but i just wanted to drop a line to wish everyone a wonderful Thanksgiving :)
this is what i have been up to - try new things and building up stock for my upcoming holiday craft shows - hope you like them let me know what you think :)

these came from an polymer clay artist on YOU TUBE her channel is called
Kriquit & Friends- check her out she is amazing :)

i had some vintage cookie cutters and came up with these little ice cream cookies .


Happy Thanksgiving and Creating

Friday, November 12, 2010

Some many Projects So little clay--- polymer clay Penquins ,Turkeys and Pens

Busy getting ready  for a Holiday Craft Show this Sunday.  Once again i have been playing with the flower canes and making beads and Pens with them.
I also have been working on some polymer clay Penguins on top of bells.....i like trying to make them all a little different....give them there own personality kinda.
In honor of Thanksgiving i also tried my hand making PC turkeys....my favorite part is the beak. 
Let me know what u like and what you have been working on.

Tuesday, November 9, 2010

Some more diversions.....so easily distracted

I was in the mood to play with polymer clay today ... and this is what i came up with.  I made these canes and it is mostly made with translucent clay.  Thin layer of white...thick layer of translucent and mainly colorful pieces of scrap clay...rolled all together thru the pasta machine on the thickest setting and rolled.  Next take a credit card ..push it it long ways, ...then twist roll and above is what you might get.  This was my first time doing this cane but it looked nice and easy and those are my type of cane.  :)

I made a pendant with one of the canes i made.  The pendant underneath is a teal blue and then i tried to shave thin slices of the cane and layer them on the blue  (that's is why it has a blue hue to it , so what ever color you use as your base will totally change the  look of the cane).  Next time i am going to add as one of the layers gold leaving and see how that makes a difference.  I haven't glazed this one yet...not sure i am going to...?

Penguins are always a holiday favorite so i have been trying to assemble several of these little guys for the crafts shows I have coming up.  Let me know what you think...any comments , suggestions or tips.  Hope you have a great week :)

Monday, November 8, 2010

Polymer clay Faux Stones

 
Well i kinda shifted gears a bit - for some time i have been wanting to make Faux Polymer clay stones and i just went for it last night. Now remember these are my first attempts and i know i need to play with color mixing some more but for my first time out i was kinda proud of myself :)  I am hoping you can guess that the top picture is supposed to be turquoise. As for the 2nd picture i am not sure of the name but i have seen a red stone with black veins...?  I had some bezels and filled them up with the clay, baked them , put a little glaze on them and this is my end result.  Let me know what you think.